
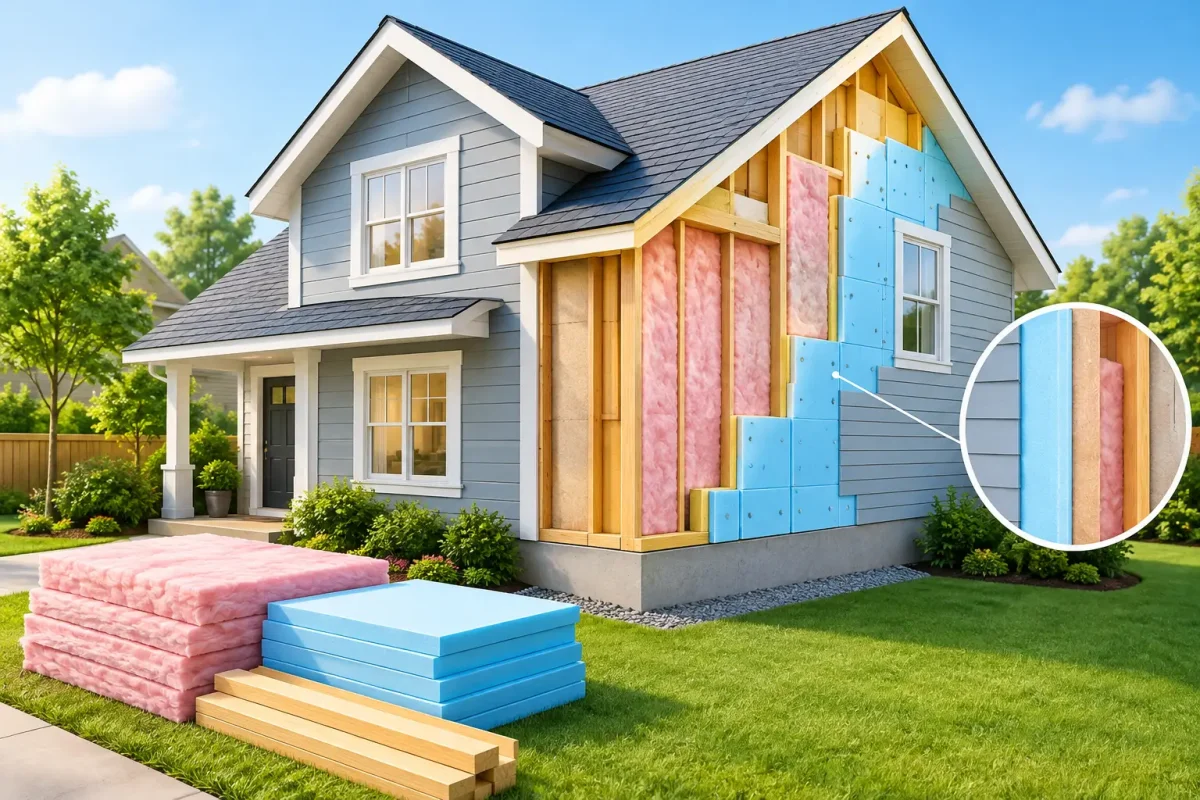
A cold room over the garage, drafts near exterior walls, and high winter heating bills often point to the same issue: the home’s exterior thermal layer is no longer doing enough. This guide to exterior insulation upgrades explains how insulation added outside the wall can improve comfort and efficiency while creating the right foundation for new siding, trim, windows, and drainage details.
Exterior insulation is not a cosmetic add-on. Once siding comes off, the wall assembly is exposed, and that is the best time to correct hidden gaps, manage moisture, and make upgrades that are difficult or expensive to add later. Done properly, the result is a home that feels more consistent from room to room and is better protected from weather.
What Exterior Insulation Actually Does
Most older homes have insulation between wall studs, but studs themselves transfer heat. This is called thermal bridging. Wood framing is less conductive than steel, yet it still allows heat to move through the wall more easily than the insulated cavities around it.
Adding continuous insulation over the exterior sheathing reduces that heat loss. It also helps keep interior wall surfaces warmer in winter, which can make rooms feel less drafty even when the thermostat setting stays the same. In summer, it slows heat gain and can reduce the strain on air conditioning.
The work usually involves removing existing siding, inspecting the sheathing and framing, installing a weather-resistant barrier and insulation system, then reinstalling siding with properly detailed flashing and trim. The right sequence matters as much as the insulation itself. A wall that is warmer but poorly flashed can still develop water damage.
When an Exterior Insulation Upgrade Makes Sense
The best time to consider exterior insulation is when siding has reached the end of its useful life or a larger exterior renovation is already planned. Removing sound, recently installed siding solely to add insulation can be hard to justify financially. But when siding is cracked, faded, loose, storm-damaged, or due for replacement, combining the projects can deliver better long-term value.
It can also make sense when a home has uneven indoor temperatures, persistent condensation around exterior walls, or walls that feel cold to the touch. These symptoms do not automatically mean insulation is the only answer. Air leaks around windows, attic bypasses, aging weatherstripping, and poor ventilation can cause similar problems. A full exterior inspection should identify the source before work begins.
Homes with older wood siding, aluminum siding, or early vinyl siding often benefit most because the renovation provides access to the wall sheathing. If there are signs of rot, staining, or soft spots behind the siding, repairs need to come before insulation. Covering damaged sheathing only hides a problem that will continue to grow.
Choosing the Right Insulation for Your Walls
There is no single best board for every property. The material should be selected based on wall construction, local climate, siding type, required R-value, moisture strategy, and the amount of added wall thickness the home can accommodate.
Expanded polystyrene, often called EPS, is a common option for exterior walls. It is durable, relatively cost-effective, and allows some drying potential. It is frequently used beneath vinyl, fiber cement, engineered wood, and other siding systems when installed as part of a properly designed wall assembly.
Extruded polystyrene, or XPS, provides a higher R-value per inch than EPS, but its environmental profile and moisture behavior should be considered. Polyisocyanurate, often called polyiso, can offer strong thermal performance but may perform differently in very cold conditions. Mineral wool boards are noncombustible and vapor permeable, making them a useful choice for certain wall assemblies, although they generally require more careful fastening and cladding support.
The goal is not simply to choose the board with the highest advertised R-value. Your contractor should consider how the insulation works with the existing sheathing, housewrap or membrane, window flashing, fasteners, and siding. A good system manages heat, air, and water together.
Thickness Changes More Than Energy Performance
Even one or two inches of exterior insulation changes the depth of the wall. That affects window and door trim, exterior light fixtures, hose connections, vents, meter bases, and transitions at the roofline and foundation.
This does not mean thicker insulation is a bad choice. It means the details need to be planned before installation starts. Windows may need extension jambs or properly built trim returns. Downspouts, exterior outlets, and vents may need to be moved outward. If these details are treated as afterthoughts, the finished exterior can look uneven and be more vulnerable to water intrusion.
Moisture Control Is the Part You Cannot Skip
Insulation upgrades fail when moisture management is ignored. Rain can get behind any cladding during wind-driven storms, so siding should not be treated as the home’s only water barrier. The wall needs a drainage plane behind the cladding, correctly integrated flashing around windows, doors, roof-to-wall intersections, and penetrations.
A rainscreen gap can be especially valuable behind many siding materials. This small drainage and ventilation space gives water a route downward and helps the wall dry. It can also improve the durability of the siding by reducing trapped moisture.
Interior humidity matters too. If warm indoor air leaks into a cold wall cavity, it can condense on cold surfaces. Exterior continuous insulation helps keep the sheathing warmer, reducing that risk, but the exact assembly still depends on climate conditions and existing wall layers. Avoid assuming that adding a vapor barrier is always the answer. In the wrong location, it can trap moisture rather than control it.
Pair Insulation With the Exterior Work That Matters Most
An exterior insulation project is an opportunity to coordinate several upgrades while the wall is open. This can save labor, reduce repeat disruption, and produce a cleaner finished result.
Start with siding. New siding protects the insulation system from weather and provides the visible curb appeal improvement homeowners expect. The material should be installed according to manufacturer requirements, including fastening schedules and clearance from roofing, grade, decks, and hardscape.
Windows and doors should be evaluated at the same time, particularly if they are drafty, difficult to operate, or nearing the end of their service life. Replacing them during the siding project allows flashing and trim to be integrated more effectively than trying to patch details later.
Do not overlook soffit, fascia, and eavestroughs. Roof runoff needs a clear path away from the wall and foundation. A new wall assembly can be compromised quickly if overflowing gutters or poorly placed downspouts keep soaking the exterior. Coordinating these components creates a more complete line of defense.
Questions to Ask Before Approving the Work
A clear estimate should identify more than the insulation type and the new siding color. Ask how the contractor will inspect and repair damaged sheathing, what weather-resistant barrier will be used, and how windows, doors, vents, and other penetrations will be flashed.
You should also ask how the siding will be fastened through the insulation, whether a rainscreen gap is recommended, and how the added wall depth will be handled at trim and roof edges. Confirm who is responsible for permits, debris removal, cleanup, and warranty coverage. These are not minor details. They are where a well-planned exterior renovation separates itself from a quick cover-up.
For homeowners in Hamilton, Burlington, and Oakville, freeze-thaw cycles, wind-driven rain, and seasonal temperature swings make those details especially worthwhile. A contractor should recommend an assembly suited to your specific home, not a one-size-fits-all package.
Plan for Value, Not Just the Lowest Price
Exterior insulation adds material, labor, and detailing costs to a siding project. The return is usually measured over time through improved comfort, lower heating and cooling demand, better moisture protection, and a more durable exterior. The exact payback depends on the home’s current insulation, energy prices, wall condition, and the scope of the renovation.
The lowest quote may leave out critical work such as sheathing repairs, flashing upgrades, trim extensions, or disposal. Compare estimates line by line and make sure each contractor is pricing the same wall assembly. A less expensive installation is not a bargain if water gets behind the siding or the insulation is not properly supported.
A professional inspection gives you a practical starting point. It can show whether exterior insulation belongs in your renovation plan now, or whether air sealing, attic insulation, window replacement, or targeted repairs should come first. The right upgrade is the one that protects the home for the long haul while making every season inside more comfortable.

28 October 2026
Best Exterior Upgrades for Resale That Pay Off
28 October 2026