
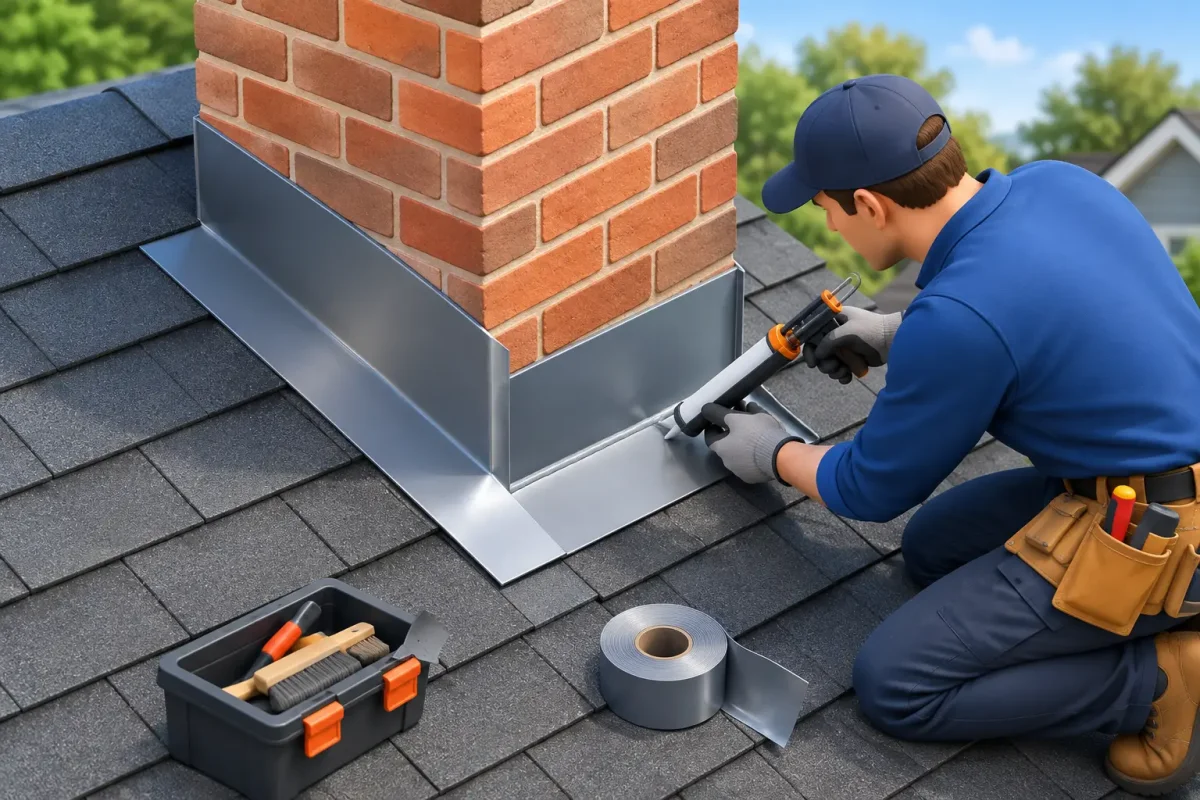
Water rarely enters a roof through the middle of a shingle field. It usually finds its way in where the roof changes direction or meets another surface – around a chimney, skylight, vent, wall, or valley. That is why roof flashing repair matters. A small failure in this thin metal barrier can lead to stained ceilings, wet insulation, damaged framing, and mold long before a homeowner sees an active drip.
Flashing problems are not always obvious from the ground. A roof can look generally sound while water is working behind the siding, under shingles, or into the attic. A professional inspection identifies whether the issue is limited to a flashing detail or connected to aging shingles, damaged fascia, clogged eavestroughs, or another part of the exterior.
What Roof Flashing Does
Roof flashing directs water away from vulnerable joints. It is commonly made from aluminum, galvanized steel, copper, or lead, depending on the roof system and the age of the home. The material itself is only part of the protection. Proper overlap, fastening, sealant placement, underlayment, and integration with shingles are what keep water moving downhill and away from the structure.
Common flashing locations include chimneys, roof-to-wall intersections, plumbing vents, skylights, dormers, valleys, and the edges of a roof. Step flashing, for example, is installed in overlapping pieces where a sloped roof meets a vertical wall. Counterflashing covers the upper edge of chimney flashing to keep water from getting behind it.
When these components are installed correctly, they work quietly for years. When one piece lifts, cracks, corrodes, or separates from the surrounding roofing, the repair should not wait. Water damage becomes more expensive the longer it is allowed to spread.
Signs You May Need Roof Flashing Repair
A ceiling stain below a chimney, skylight, or exterior wall is one of the clearest warnings. The stain may darken after heavy rain, snow melt, or wind-driven storms. Peeling paint, bubbling drywall, musty attic odors, and visible damp insulation also deserve attention, even if there is no active leak at the time.
Outside, look for loose or bent flashing, cracked sealant, rust, missing shingles near flashing, and gaps where the roof meets a wall or chimney. In some cases, homeowners notice water running behind a gutter or staining the fascia board. That may be a flashing issue, but it can also point to eavestrough slope, overflow, or roof-edge damage.
Do not assume the source of a leak is directly above the stain. Water can travel along rafters, roof decking, and wall framing before it appears indoors. A reliable diagnosis requires inspecting the full area around the suspected entry point.
Why Caulk Alone Is Rarely a Lasting Fix
Roofing sealant has a role in a properly completed repair, but it is not a substitute for sound flashing. A heavy bead of caulk over a gap may slow a leak temporarily, yet it can crack as temperatures change or pull away from dirty, weathered surfaces. It may also hide the underlying problem and make a later repair more difficult.
The durable solution is usually mechanical water shedding: flashing layers that overlap in the direction water naturally flows. On a roof-to-wall connection, that means the flashing must work with the shingles and siding rather than simply being sealed at the surface. Around a chimney, the repair may involve replacing apron flashing, step flashing, back-pan flashing, and counterflashing depending on where the failure occurred.
There are exceptions. If flashing is in good condition but a small sealant joint has failed, resealing may be appropriate. The key is confirming that the metal, fasteners, and surrounding roof materials are still secure.
What a Professional Flashing Inspection Should Cover
A proper inspection begins with the reported symptoms, then follows the water path from the roof downward. The contractor should examine the roof covering, flashing condition, penetrations, chimney masonry, skylight curb, valleys, roof edges, gutters, soffit, fascia, and attic where accessible.
The goal is not to sell a full roof replacement when a targeted repair will solve the problem. It is also not to patch one visible crack when worn shingles or deteriorated underlayment have made the entire area vulnerable. The right recommendation depends on the age of the roof, the extent of moisture damage, the type of flashing, and whether the affected area can be integrated correctly with existing materials.
For homes with siding damage near a roof-to-wall joint, it is especially useful to work with an exterior contractor who understands both systems. Flashing can sit behind siding, trim, and house wrap. Repairing the roof portion without addressing a compromised wall detail can leave the home exposed.
Roof Flashing Repair Options
The scope of roof flashing repair can range from a straightforward reseal to rebuilding a complex transition. A qualified contractor may recommend one of the following approaches based on the inspection.
Resealing a Limited Joint
This is suitable when the flashing is intact, correctly installed, and firmly secured, but sealant around a small penetration or counterflashing joint has failed. The surface must be cleaned and prepared so the new sealant can bond properly. This is a maintenance repair, not a cure for corroded or poorly lapped metal.
Refastening or Replacing Damaged Flashing
Wind, thermal movement, and aging fasteners can cause metal flashing to lift or loosen. If the surrounding shingles remain serviceable, the contractor may remove the affected materials, install new flashing, and carefully reassemble the roof area. Matching shingle color can be difficult on older roofs, but a well-planned repair should prioritize watertight performance over a perfect cosmetic match.
Repairing Chimney Flashing
Chimney leaks need careful diagnosis because water can enter through failed mortar, cracked crowns, masonry damage, or roof flashing. A roof repair may involve new step and apron flashing, while a masonry issue may need separate attention. Treating only one source can leave the leak unresolved.
Rebuilding Roof-to-Wall Flashing
This repair may require temporarily removing siding or trim to access the full flashing assembly. It is more involved than applying sealant at the visible edge, but it is often the correct way to stop recurring leaks. The wall cladding, flashing, and roofing must be layered in the right order so water drains outward.
Coordinating Flashing Work With a Roof Replacement
If shingles are brittle, curled, near the end of their service life, or leaking in several areas, replacing isolated flashing can be poor value. New flashing should be installed during a roof replacement, not reused automatically. This is also the ideal time to inspect roof decking, underlayment, ventilation, gutters, soffit, and fascia for related concerns.
Timing Matters, Especially After Storms
A roof leak is not always an emergency, but it should be treated as urgent. Active dripping, wet electrical fixtures, a sagging ceiling, or a rapidly growing stain requires immediate action. Move belongings out of the area, contain water if it can be done safely, and contact a qualified roofing professional. Do not climb onto a wet or icy roof.
After windstorms, heavy rain, or freeze-thaw weather, schedule an inspection if you notice loose shingles, visible metal movement, granules in gutters, or new water marks indoors. Catching a localized flashing problem early can prevent damage to insulation, drywall, trim, and structural wood.
Choose Repair Work That Protects the Whole Exterior
The best roof flashing repair is not the fastest-looking patch. It is a repair that identifies where water entered, restores proper drainage, and checks the materials around it for hidden damage. Licensed and insured contractors should provide a clear scope of work, explain whether repair or replacement makes more sense, and stand behind the completed work.
For homeowners planning broader exterior work, coordinating roofing, eavestrough, soffit, fascia, siding, and trim can reduce repeat disruptions and help ensure all water-management details work together. Petra Eavestrough & Siding approaches these areas as one exterior system, not a collection of unrelated parts.
If a stain has appeared or a flashing detail looks loose, do not wait for the next storm to provide an answer. A focused inspection now can protect the home you have worked hard to maintain.
4 November 2026
Why Soffit Vents Matter in Southern Ontario Homes
4 November 2026